 |

As mentioned before, the see-through images are the IR images produced by a CCD. Therefore any devices, such as camcorders, digital cameras and
CCD cameras for industry, can be good see-through devices. The photograph below
shows a CCD, such as you may find in a camcorder or digital camera.
However, CCD sensitivity level for the NIR may vary by device, and the differences in the sensitivity level can also directly affect the see-through images. CCD sensitivity level for the NIR can depend on the amount of the NIR reaching the CCD in a given environment and its processing efficiency. The amount of the NIR reaching the CCD plays the most significant role in deciding the quality of a see-through image.
Among almost all CCD devices on sales, Sony's Nightshot Camcorders have the highest sensitivity level for the NIR. To take a see-through picture with a Sony Nightshot Camcorder, you just need to attach the PF on the object lens after setting it on the Nightshot mode.
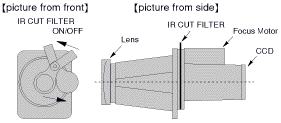
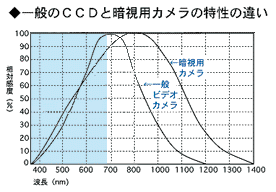
Switching to 'Nightshot mode' physically displaces the camcorder's internal glass filter called "IR Cut Filter (ICF)", which means that much more NIR light reaches the CCD. In-between the optical lens and the CCD, most camcorders have this special "ICF". It is there to compensate the colorings and the tones of the information reaching the CCD by blocking the NIR and ultraviolet rays. Since the CCD is originally more sensitive to NIR rather than the visible rays, as shown at the graph below, it would be impossible to create a natural image on the viewfinder or LCD screen for the human eye without this ICF. However, this ICF, which blocks off the NIR, is the biggest obstacle in seeing-through and night viewing.
As shown below, a Nightshot camcorder has a external switch - the "Nightshot" switch - to easily remove this ICF.

Therefore it is possible to obtain a clear see-through image under any NIR environment. In the Nightshot mode, the ICF is displaced from the path of the light rays, while the CCD can receive an ample amount of the NIR. If you take a look at the graph shown below, you can see the clear differences between the amount of the NIR reaching a Sony Nightshot's CCD and a normal camcorder's CCD with ICF installed.

According to the graph, there is twice as much total NIR reaching the CCD (the surface area below the line) in cases where the wavelengths exceed 690nm. Further, the CCD sensitivity peak value of a normal camcorder is roughly about 700nm while the CCD sensitivity peak value of the Sony Nightshot is roughly about 800nm. There is a 100nm-shift difference in these two camcorders. In short, if the ICF is removed, much more NIR can be delivered to the CCD, so one can easily obtain clear see-through images under any NIR environment.
3 Types of Sony Nightshot Models:
"Old", "Semi-Modified New" & "Fully-Modified New"
There are three different types of Nightshot models available. If you have a Sony Nightshot camcorder or are going to purchase a Nightshot camcorder it will help your degree of success to know the differences among these 3 models.
Old Models
Old Models are the original Nightshot models that Sony produced before August 12, 1998. Therefore if you have purchased your Nightshot before August 12, 1998, then yours is definitely the Old model.
If you aren't sure of when you purchased the Nightshot, then check on the manufacturer's label with the date the camcorder was made located on the bottom.
You can also test your camcorder by attempting an actual picture taking. Old Models can get clear shots (with a green tint) of the subjects even in bright daylight when using Nightshot mode. This means that you can use the Nightshot mode even in the bright daylight without any problem. Also when you press the manual exposure button and roll the exposure dial down to the minimum the LCD screen and viewfinder should go completely BLACK as shown below.

Thus, old models have full control of exposure even in Nightshot mode.
Semi-Modified New Models
Semi-Modified New Models are the Nightshot models that Sony produced from August 1998 until December 1998. There are no differences between Semi-Modified New Models and Old Models in appearance. Yet Semi-Modified New Models have only partial control of exposure in Nightshot mode as described below.
Firstly, Semi-Modified New models can't get acceptable shots in bright daylight when using Nightshot mode. The screen is often too bright to discern any detail at all. Of course, these models also offer a manual exposure feature and when you press the manual exposure button the exposure meter is displayed on the LCD screen and viewfinder. However, no matter how much you roll the exposure dial down there is no decrease in brightness. Even when you roll the exposure dial down to the minimum, far from going completely BLACK, the screen and viewfinder would be still too bright.
The easiest method to overcome this over exposure problem is to set the program AE (Auto Exposure) to "Sports Lesson Mode" when using Nightshot mode. Sports Lesson Mode automatically selects the highest shutter speed based on available light, from 1/250 up to 1/4000. So this mode enables you to get acceptable shots even in bright daylight.
However, this method doesn't mean full control of exposure in Nightshot mode. The screen and viewfinder may still be too bright in very bright daylight. This is because that manual exposure control doesn't work in Sports Lesson Mode. Unlike in normal mode, when you can roll the exposure dial down until the image is BLACK, in Sports Lesson mode you cannot affect the image this way. However Semi-Modified New Models can also have full control of exposure in Nightshot mode with other methods as described further on.
Fully Modified New Models
All Nightshot models produced since January 1999 are Fully Modified New Models. These models have NO control of exposure at all in Nightshot mode. This makes it completely impossible to take pictures in bright daylight using Nightshot mode. The LCD screen and viewfinder should go completely WHITE when using Nightshot mode in bright daylight as shown below. This is because that when Nightshot is used the aperture is fully open and the exposure is automatically set to maximum.

In these Fully Modified New Models, when you press the manual exposure button or roll the exposure dial down no effect will occur at all. What is worse, the exposure meter doesn't even appear on the LCD screen or viewfinder. The program AE (Sports Lesson Mode) doesn't work either. However these models can also have full control of exposure in Nightshot mode by applying one of the following methods:
How to get Full Control of Exposure in the New Models
The Internal Microswitch Method
This method involves opening your camcorder. If you open the camcorder you will see a small lever mounted on the lens that moves the ICF away from the CCD (when Nightshot is switched on). This lever also presses a Microswitch (attached to a flexible board) when Nightshot is engaged.
When this Microswitch is pressed 3 things happen. Firstly, the iris in the lens is forced open (this results in the "white-out" if there is too much light present) and second it sets the green tint added to the picture to give that "Night Scope" appearance. The 3rd thing the Microswitch does is to turn on the IR emitter on the front of the camcorder.
This small Microswitch is held in place with a small screw. By loosening the screw the Microswitch can be adjusted away from the Nightshot lever so that it is never pushed when Nightshot is engaged. Thus, the camcorder can have full control of exposure even in Nightshot mode like the Old Models. The images tend to take on a red tint (rather than a green tint). Although very effective, this method renders all other Nightshot functions inoperative - such as the Nightshot LEDs on the front of the camcorder and the HotShoe functionality.
The External Nightshot Switch Method
The same effect can be obtained without opening the camcorder by setting the external Nightshot switch to a point, about half way between off and on. At a particular point, the ICF is pulled out of the light path but the internal Microswitch is not yet pressed. This makes the camcorder highly sensitive to NIR but it doesn't know it's in Nightshot mode and therefore still allows full control of exposure. If the switch is set to the proper point, the image will take a red tint.


The problem is that the Nightshot switch, especially vertically version of the Nightshot switch, tends to suddenly spring back to on or off. However, this can be remedied by putting a small piece of rubber in the path of the switch.
This External Nightshot Switch Method can be applied to both vertical and horizontal Nightshot switch models but unfortunately there are some Nightshot models which this method don't work on. In this case, the Internal Microswitch Method should be applied.